출처: https://bumcrush.tistory.com/182 [맑음때때로 여름]


설치한 것들


자바런타임에서 버전이랑 설정 가능


컨트롤 쉬프트 P 누르고 스프링 버전이랑 등등 선택해준다.

스프링 버전선택 그다음에 java

그다음에 이름 설정해줌 (ex: com.회사이름.프로젝트이름)


오케이오케이~


필요한 폴더들 생성해준다

main, webapp, 등등


어플리케이션 프로퍼티스에서 각종 설정 가능 (yml과 같음..)

spring에서의 설정파일이라고 생각하면 된다.


mapper에는 위에..

<?xml version="1.0" encoding="UTF-8"?>
<!DOCTYPE mapper PUBLIC "-//mybatis.org//DTD Mapper 3.0//EN" "http://mybatis.org/dtd/mybatis-3-mapper.dtd">
<mapper namespace="dao주소">
</mapper>

pip install flask_cors

--------------------------------------------------------

import flask_cors CORS, cross_origin

CORS(app) # 모든 요청

--------------------------------------------------------

CORS(app, resources={r'*': {'origins': '*'}}) #모든 곳에서 호출하는 것을 허용

CORS(app, resources={r'*': {'origins': 'http://www.test.com'}}) # http://www.test.com 에서의 호출만 허용

CORS(app, resources={r'/_api/*': {'origins': 'http://www.test.com:5000'}}) # http://www.test.com:5000 에서의 호출만 허용

ecsimsw.tistory.com/entry/Spring-MVC-multipartResolver-Http-multipart-request?category=915995


참고 :

khanrc.tistory.com/entry/REST-API-%EC%84%9C%EB%B2%84-%EC%A0%9C%EC%9E%91%EA%B8%B0-2-Flask-%EC%84%9C%EB%B2%84-%EC%98%AC%EB%A6%AC%EA%B8%B0


yum install python3

> pip3가 자동으로 깔린다


pip3 install ~~

로  사용해야함 

1. 무료 도메인 발급

.

(my.freenom.com/)

사용하고 싶은 도메인 이름을 Check 해봅니다. ‘Free’라는 태그가 붙은 도메인은 무료이므로 사용하고 싶은 것을 고르면 됩니다. [Get it now!]를 클릭합니다. 버튼이 [Selected]로 바뀌면 발급이 완료된 것입니다.

Period 에서 무료로 사용할 수 있는 기간을 선택할 수 있습니다. 12개월을 선택 후 [Continue]를 클릭합니다.
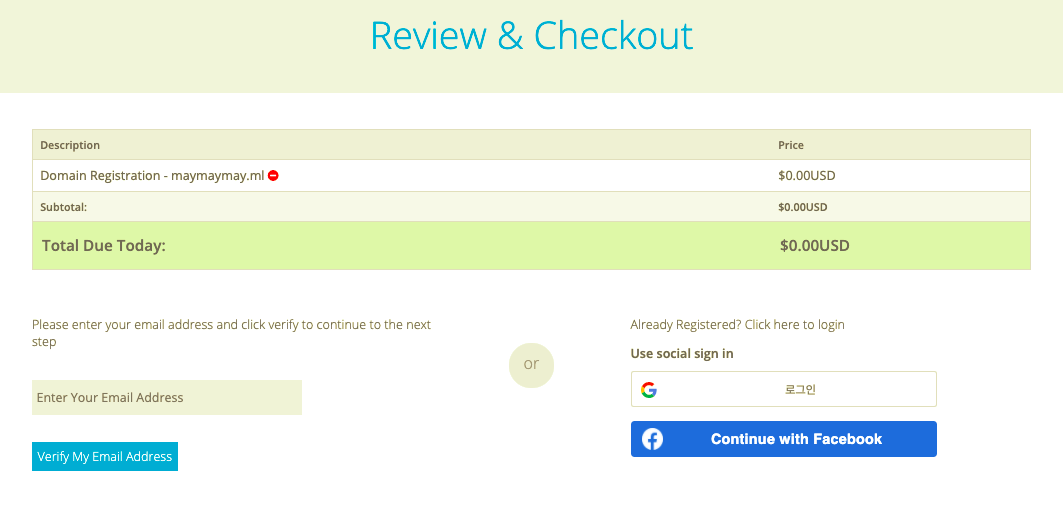
구글 로그인으로 무료 체크아웃하기

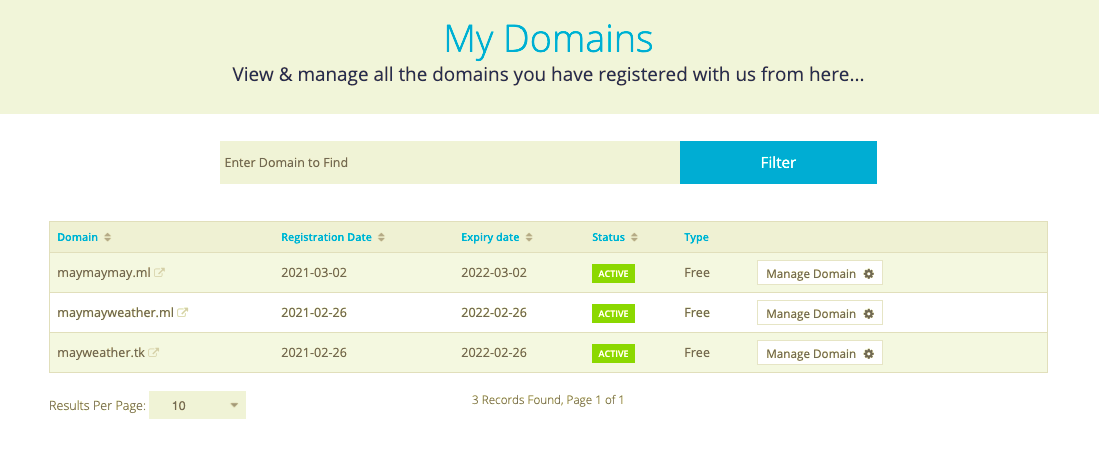
생성된 도메인은 상단의 [Services] -> [My Domains]를 클릭하면 위와 같이 구매한 도메인을 확인할 수 있습니다.

2. Route 53 에 도메인 등록

이제 AWS 콘솔로 넘어가겠습니다. Route 53 콘솔로 들어가 [Hosted zones] -> [Create Hosted Zone]을 클릭합니다.

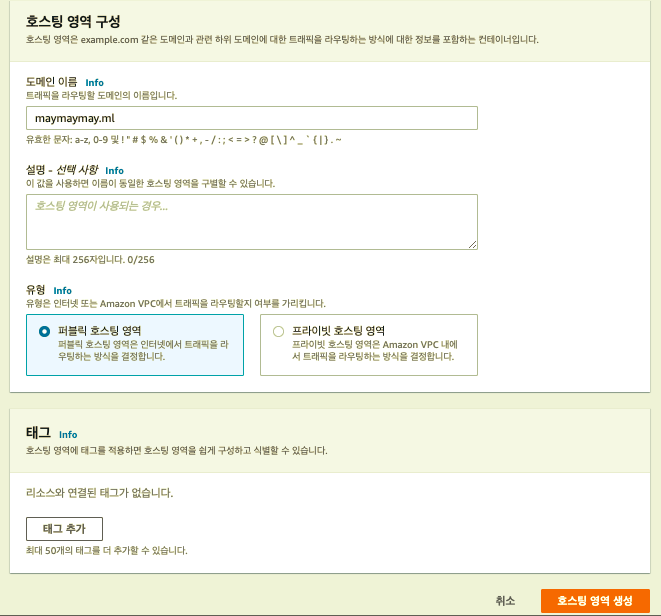
Domain Name에 이전에 발급받은 도메인을 기입합니다. [Create]를 클릭합니다.
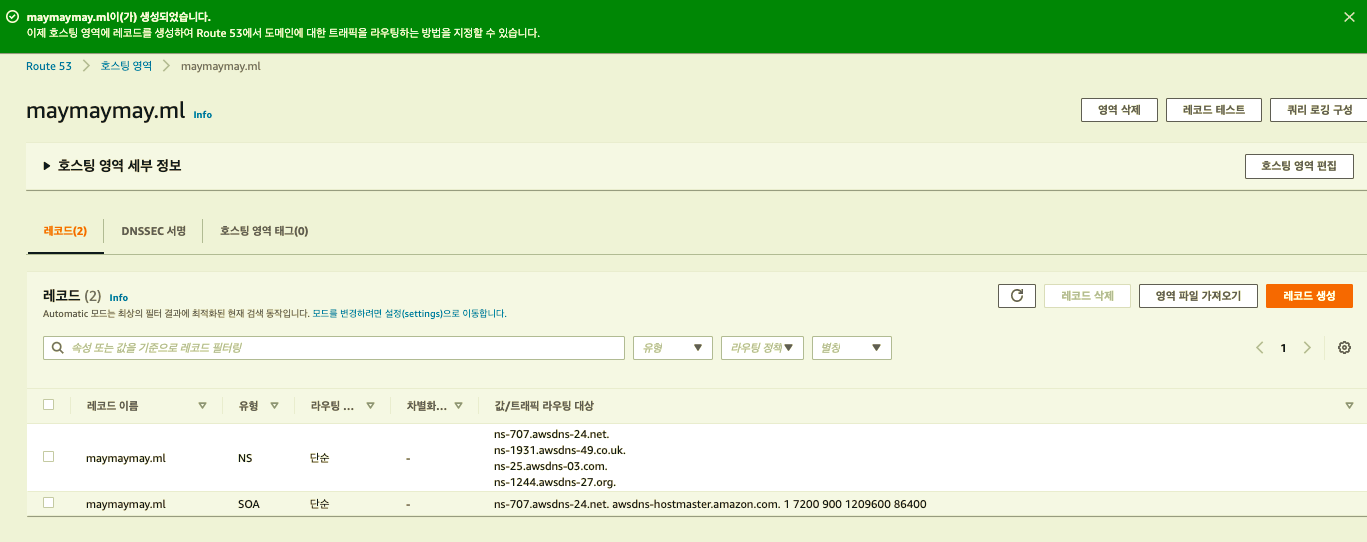
생성 완료!

NS 타입과 SOA 타입의 레코드 셋이 생성되어 있는 것을 확인할 수 있습니다. NS는 네임 서버 레코드, SOA는 권한 시작 레코드입니다.


레코드 생성 버튼을 클릭해 빠른 레코드를 생성합니다.

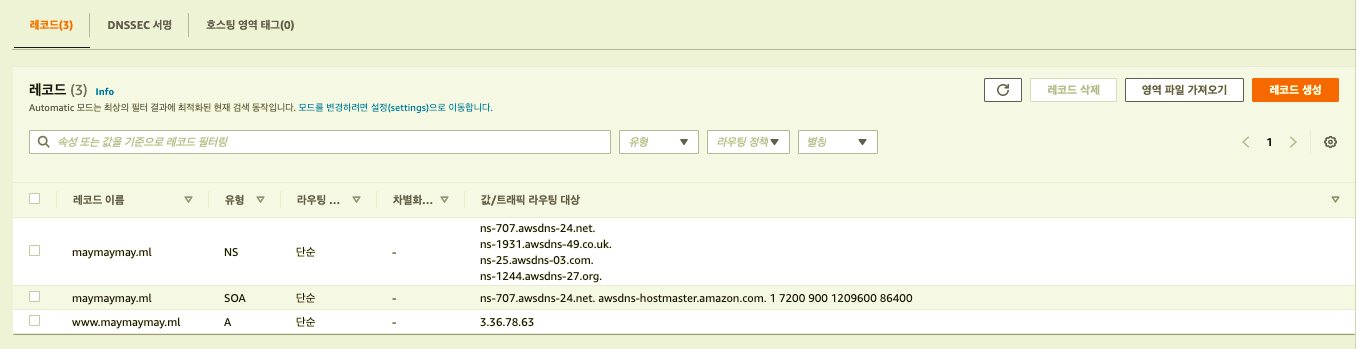
Name 에는 하위 도메인을 설정할 수 있습니다. 여기서는 일반적으로 쓰이는 www를 사용하겠습니다. Type은 A 레코드를 선택하고 값에 인스턴스 퍼블릭 IP 주소를 입력합니다. 설정을 마쳤으면 [Create]를 클릭합니다.

레코드 생성 완료!

Record Set에 방금 생성한 A 레코드의 도메인을 확인할 수 있습니다. 하지만 여기서 끝난 것이 아닙니다. 네임서버를 이전에 발급받은 무료 도메인에 적용해 주어야 합니다.

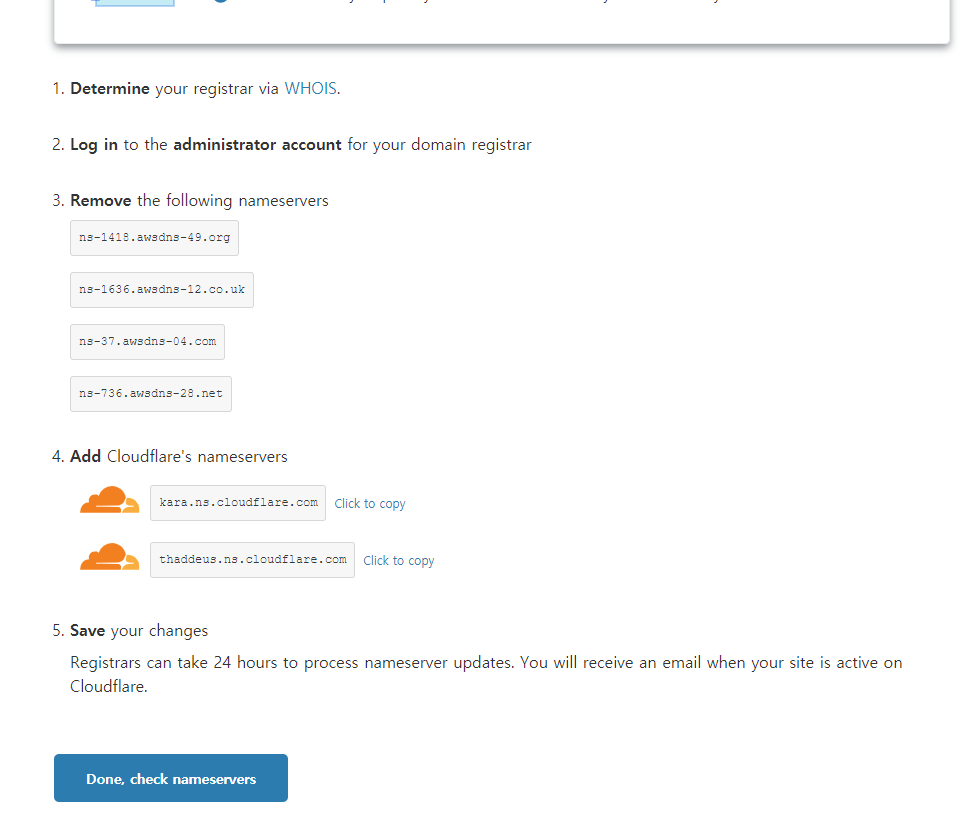
3. 도메인 AWS Route53의 NameServer로 변경

freenom 사이트의 My Domains에서 구매한 도메인의 [Manage Domain]을 클릭합니다.

[Management Tools] -> [Nameservers] 를 클릭한 다음, Use custom nameservers (enter below)를 체크하고 Route 53 NS 레코드의 Value 값을 넣어줍니다. 전부 입력하고 [Change Nameservers]를 클릭합니다.

네트워크 전파 속도 때문에 네임서버를 변경하면 바로 적용이 안 되기 때문에 몇 분 내지는 몇 시간의 시간이 필요합니다.

www.maymaymay.ml:8080/ 테스트 성공 !

등록한 도메인을 브라우저 주소창에 입력하면 톰캣 화면이 출력되는 것을 확인할 수 있습니다.


4. CloudFlare를 이용해 https 주소 우회하기

※ 도메인에 HTTPS를 적용하기 위해 Cloud Flare 사용하기 ※

▶ Cloud Flare 가입: https://dash.cloudflare.com/sign-up

클라우드 플레어에 가입한 이후에 HTTPS를 적용할 수 있습니다.


 주소 입력


4. add cloudflare's nameservers  (나중에 복사해서 프리넘에 등록)


ipv4 address는 ec2에 있는 아이피이다.


Freenom 네임서버로 이동합니다.

기존에 입력했던 Route 53 네임서버를 삭제하고, Cloudflare 네임서버 2개를 추가합니다.

이제 시간이 조금 지나면 SSL에 인증서가 발급되어 있을 겁니다. Active 상태가 되면 페이지 규칙을 추가할 수 있습니다.


Page Rules 에 들어가 아래와 동일하게 ****페이지 규칙을 추가합니다.

http://domainname.tk/*

http://www.domainname.tk/*

Always Use HTTPS

5. AWS 컴퓨트 서비스에서 웹서버 설정하기

먼저 AWS EC2 > 인스턴스 > 보안 그룹 에 https 80 포트를 추가합니다.

현재는 http://www.lecturesearch.shop:8080 처럼 도메인에 8080포트번호를 명시하여야 웹사이트로 접근이 됩니다.

이는 톰캣은 기본적으로 8080포트를 사용하는데, 브라우저가 기본적으로 80포트로 접근하기 때문입니다.

이러한 번거로움이 없도록 80포트를 8080포트로 리다이렉트 해주도록 합니다.

iptables 명령을 사용하여 추가해주도록 합니다.

# yum install -y httpd # service httpd start # iptables -t nat -I PREROUTING -p tcp --dport 80 -j REDIRECT --to-port 8080 # service iptables save # service httpd status # service httpd restart

https://maymayweather.ml/main/ 테스트 성공!


하지만 이렇게 https로 주소를 우회할 시 새로운 문제가 생길 수 있다.

https 프로토콜만 지원하는 특정 웹페이지에서 AJAX 통신을 시도한다고 가정했을 때

url : ‘/aaa/bbb/file.ext’

위의 url 로 파라미터를 던지고 결과를 받아야 하는데 아래와 같은 오류가 발생할 것이다.

Mixed Content: The page at ‘https://page.com‘ was loaded over HTTPS, but requested an insecure XMLHttpRequest endpointThis request has been blocked; the content must be served over HTTPS.

이럴 경우 2가지의 해결 방법이 있다.

  1. 싱글페이지를 포기하고 https 주소가 꼭 필요한 부분에서만 https 주소를 사용하는 페이지로 이동을 한다.

  2. 전부 https 로 통일한다.


---


참고

tech.cloud.nongshim.co.kr/2018/10/16/%EC%B4%88%EB%B3%B4%EC%9E%90%EB%A5%BC-%EC%9C%84%ED%95%9C-aws-%EC%9B%B9%EA%B5%AC%EC%B6%95-8-%EB%AC%B4%EB%A3%8C-%EB%8F%84%EB%A9%94%EC%9D%B8%EC%9C%BC%EB%A1%9C-route-53-%EB%93%B1%EB%A1%9D-%EB%B0%8F-elb/

프로젝트를 하면서 EC2를 사용했는데

사소한 에러 수정을 하더라도.. war를 업로드할때마다 게시판에 업로드 해둔 파일들이 사라짐...

그냥 다시 올리면 대지머.. 하고 그러려니 했는데 너무 귀찮아서 S3를 사용하기로 방금 마음 먹었다 ^^


가장 먼저 당연히 pom.xml에 라이브러리를 등록해준다 

		<!-- https://mvnrepository.com/artifact/com.amazonaws/aws-java-sdk -->
		<dependency>
			<groupId>com.amazonaws</groupId>
			<artifactId>aws-java-sdk</artifactId>
			<version>1.9.2</version>
		</dependency>


-


offbyone.tistory.com/114

참고블로그


Java로 썸네일(Thumbnail) 이미지 만들기

갤러리와 같은 웹애플리케이션을 만들게 되면 이미지의 썸네일을 만들게 됩니다. 가끔 보면 썸네일 없이 원본이미지를 줄여서 보여주고 있는곳이 있는데, 모바일 환경이라면 시간과 데이터 사

offbyone.tistory.com


scalr 라이브러리 pom.xml에 등록

		<!--scalr 라이브러리 -->
		<dependency>
			<groupId>org.imgscalr</groupId>
			<artifactId>imgscalr-lib</artifactId>
			<version>4.2</version>
		</dependency>


내가 사용한 코드 / ootdphoto는 MultipartFile이다.

package com.mw.ootd.Service;

import java.awt.image.BufferedImage;
import java.io.File;
import java.io.IOException;

import javax.imageio.IIOException;
import javax.imageio.ImageIO;
import javax.servlet.http.HttpServletRequest;

import org.imgscalr.Scalr;
import org.mybatis.spring.SqlSessionTemplate;
import org.springframework.beans.factory.annotation.Autowired;
import org.springframework.stereotype.Service;

import com.mw.ootd.Domain.ootdBoard;
import com.mw.ootd.dao.ootdInterfaceDao;

@Service
public class ootdRegService {
	// 글등록과 관련된 기능이 모여있는 서비스

	private ootdInterfaceDao dao;

	@Autowired
	private SqlSessionTemplate template;


	File newFile = null;
	String ootdphotoname = null;
	String saveDirPath = null;


	public int ootdWrite(ootdBoard ootd, HttpServletRequest request) throws Exception {
		int result = 5;
		// 성공은1 만약에 사진이없다면 0, 글 내용이 없다면 2를 반환하고 알려줄 것.

		if (ootd.getOotdtext().trim().isEmpty()) {
			result = 2;
			return result;
		}

		// 사진이 정상적인 파일인지 확인하기
		if (ootd.getOotdphoto() != null && !ootd.getOotdphoto().isEmpty()) {

			String uploadPath = "/fileupload/ootdimage";
			saveDirPath = request.getSession().getServletContext().getRealPath(uploadPath);
			// 새로운 파일이름 만들어주기
			ootdphotoname = String.valueOf(System.nanoTime());
			newFile = new File(saveDirPath, ootdphotoname);

		} else {
			// 정상적인 사진이 없을 경우
			result = 0;
			return result;

		}

		// 파일저장하기 > s3 변경
		try {
			ootd.getOotdphoto().transferTo(newFile);

		} catch (IllegalStateException e) {
			e.printStackTrace();
		} catch (IOException e) {
			e.printStackTrace();
		}

		// 파일 이름 저장하기
		if (ootdphotoname != null) {
			ootd.setOotdphotoname(ootdphotoname);
		}

		// 썸네일 만들기
		makeThumbnail(saveDirPath, ootdphotoname, "png");

		// 데이터베이스에 저장하기
		try {
			dao = template.getMapper(ootdInterfaceDao.class);
			result = dao.ootdDocInsert(ootd);
			// 글번호값 리턴
			// int ootdidx = dao.ootdidxReturn(ootdphotoname);
			// System.out.println(ootdidx);
			// ootdidx에 맞는 좋아요 칼럼 생성
			// dao.makeLikeCol(ootdidx);

		} catch (Exception e) {
			e.printStackTrace();
			if (newFile != null && newFile.exists()) {
				newFile.delete();
			}
		}

		return result;

	}

	private void makeThumbnail(String filePath, String fileName, String fileExt) throws Exception {
		// 저장된 원본파일로부터 BufferedImage 객체를 생성합니다.
		BufferedImage srcImg = ImageIO.read(newFile);
		// 썸네일의 너비와 높이 입니다.
		int dw = 250, dh = 250;
		// 원본 이미지의 너비와 높이 입니다.
		int ow = srcImg.getWidth();
		int oh = srcImg.getHeight();

		// 원본 너비를 기준으로 하여 썸네일의 비율로 높이를 계산합니다.
		int nw = ow;
		int nh = (ow * dh) / dw;

		// 계산된 높이가 원본보다 높다면 crop이 안되므로
		// 원본 높이를 기준으로 썸네일의 비율로 너비를 계산합니다.
		if (nh > oh) {
			nw = (oh * dw) / dh;
			nh = oh;
		}
		// 계산된 크기로 원본이미지를 가운데에서 crop 합니다.
		BufferedImage cropImg = Scalr.crop(srcImg, (ow - nw) / 2, (oh - nh) / 2, nw, nh);

		// crop된 이미지로 썸네일을 생성합니다.
		BufferedImage destImg = Scalr.resize(cropImg, dw, dh);

		// 썸네일을 저장합니다. 이미지 이름 앞에 "THUMB_" 를 붙여 표시했습니다.
		String thumbName = filePath + "/THUMB_" + fileName;
		File thumbFile = new File(thumbName);
		//ImageIO.write(destImg, "PNG", thumbFile);
		//저장>s3
		ImageIO.write(destImg, fileExt.toUpperCase(), thumbFile);
	}
}

www.postman.com/downloads/다운로드 하거나 크롬 앱에 설치해서 사용


body-parser 설치해준다


: 이전에 생성한 테이블 참고

javappo.tistory.com/263


[mongodb] model & Schema 생성

const mongoose = require('mongoose') const userSchema = mongoose.Schema({ name :{ type : String, maxlength : 50 }, email : { type : String, trim : true, unique : 1 }, passworld : { type : String, mi..

javappo.tistory.com


const express = require('express')
const app = express()
const port = 3000

const {user, User} = require("./models/User");

const bodyParser = require('body-parser');
//application/x-www/-fom-urlencoded
app.use(bodyParser.urlencoded({extended:true}));
//application/json
app.use(bodyParser.json());

const mongoose = require('mongoose')
mongoose.connect('mongodb+srv://HYOSEON:비~~밀~~번~~호@hyseonbolierplate.9vvek.mongodb.net/myFirstDatabase?retryWrites=true&w=majority',{
    useNewUrlParser: true, useUnifiedTopology:true, useCreateIndex:true, useFindAndModify :false
}).then(() => console.log('mongoDB Connected..'))
 .catch(err => console.log(err))

app.get('/', (req, res) => {  res.send('Hello World!')})


app.post('/register', (req, res) => {
 
    // 회원가입할 때 필요한 정보들을 클라이언트에서 가져오면
    // 그것들을 db에 넣어준다


    const user = new User(req.body)

    user.save((err, userInfo) =>{
        if(err) return res.json({
            success :false, err
        })
        return res.status(200).json({
            success : true
        })
    })
})

app.listen(port, () => {  console.log(`Example app listening at http://localhost:${port}`)})

npm run start로 실행시켜주고 POSTMAN에 입력


git-scm.com/download/win


Git - Downloading Package

Downloading Git Now What? Now that you have downloaded Git, it's time to start using it.

git-scm.com


git init (깃 생성)

Microsoft Windows [Version 10.0.19041.804]
(c) 2020 Microsoft Corporation. All rights reserved.

C:\Users\bit\Documents\boiler-plate>git init
Initialized empty Git repository in C:/Users/bit/Documents/boiler-plate/.git/

C:\Users\bit\Documents\boiler-plate>git status
On branch master

No commits yet

Untracked files:
  (use "git add <file>..." to include in what will be committed)
        index.js
        models/
        node_modules/
        package-lock.json
        package.json

nothing added to commit but untracked files present (use "git add" to track)

C:\Users\bit\Documents\boiler-plate>


git add를 하면 소ㅑㄹ라소ㅑㄹ라~~ 라이브러리까지 다 올라감.. (staging area에)


C:\Users\bit\Documents\boiler-plate>git add .
warning: LF will be replaced by CRLF in node_modules/.bin/mime.
The file will have its original line endings in your working directory
warning: LF will be replaced by CRLF in node_modules/.bin/mime.ps1.
The file will have its original line endings in your working directory
warning: LF will be replaced by CRLF in node_modules/.bin/semver.
The file will have its original line endings in your working directory
C:\Users\bit\Documents\boiler-plate>git status
On branch master

No commits yet

Changes to be committed:
  (use "git rm --cached <file>..." to unstage)
        new file:   index.js
        new file:   models/User.js
        new file:   node_modules/.bin/mime
        new file:   node_modules/.bin/mime.cmd
        new file:   node_modules/.bin/mime.ps1
        new file:   node_modules/.bin/semver
        new file:   node_modules/.bin/semver.cmd


staging area에 올라간 ㅎㅎ.. node_modules (라이브러리)는 지워준다..

C:\Users\bit\Documents\boiler-plate>git rm --cached node_modules -r
rm 'node_modules/.bin/mime'
rm 'node_modules/.bin/mime.cmd'
rm 'node_modules/.bin/mime.ps1'
rm 'node_modules/.bin/semver'
rm 'node_modules/.bin/semver.cmd'
rm 'node_modules/.bin/semver.ps1'
rm 'node_modules/@types/bson/LICENSE


그리고 .gitignore 만들어줌..


commit -m "메모"

(깃허브에서 메모하는거랑 같은 것..)


C:\Users\bit\Documents\boiler-plate>git status
On branch master

No commits yet

Changes to be committed:
  (use "git rm --cached <file>..." to unstage)
        new file:   index.js
        new file:   models/User.js
        new file:   package-lock.json
        new file:   package.json

Untracked files:
  (use "git add <file>..." to include in what will be committed)
        .gitignore


C:\Users\bit\Documents\boiler-plate>git commit -m "처음 저장소 올림"
[master (root-commit) 1540315] 처음 저장소 올림
 4 files changed, 668 insertions(+)
 create mode 100644 index.js
 create mode 100644 models/User.js
 create mode 100644 package-lock.json
 create mode 100644 package.json

C:\Users\bit\Documents\boiler-plate>git status
On branch master
Untracked files:
  (use "git add <file>..." to include in what will be committed)
        .gitignore


C:\Users\bit\Documents\boiler-plate>git commit -m "깃이그노어 추가"
[master 684ec62] 깃이그노어 추가
 1 file changed, 1 insertion(+)
 create mode 100644 .gitignore

C:\Users\bit\Documents\boiler-plate>git status
On branch master
nothing to commit, working tree clean

C:\Users\bit\Documents\boiler-plate>

'DB > ETC' 카테고리의 다른 글

[mongodb] model & Schema 생성  (0) 2021.02.24
[mongodb] 유저생성 및 nodejs 몽고 DB연결  (0) 2021.02.24
[mongodb] 몽고DB 클러스터 생성하기  (0) 2021.02.24

+ Recent posts