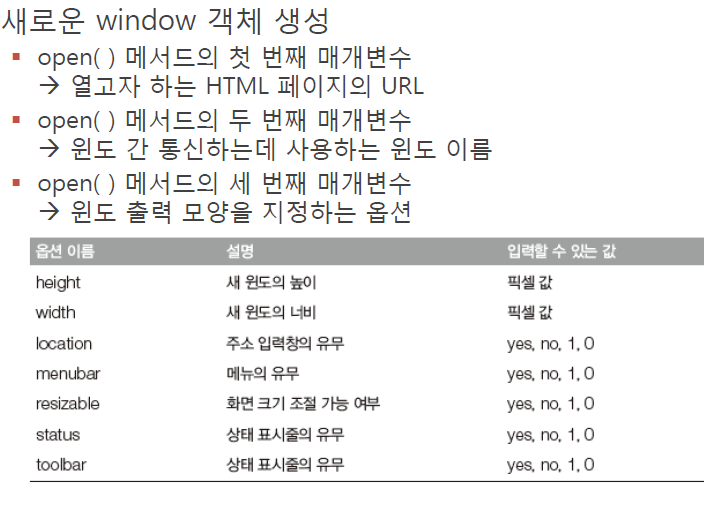
출처: https://bumcrush.tistory.com/182 [맑음때때로 여름]

window 객체의 로드 완료
- window 객체 로드가 완료되는 때는?

-> HTML 페이지에 존재하는 모든 태그가 화면에 올라가는 순간이 로드가 완료되는 순간

 onload를 사용한 경우

1) [ 1 ] 창뜨고 

2) 변경1 뜨면서 [ 2 ] 창 뜨고

3) 변경2가 출력

// onload가 아래쪽 body를 먼저 실행시켜준다.

<!DOCTYPE html>
<html lang="">
<head>
    <meta charset="utf-8">
    <meta name="viewport" content="width=device-width, initial-scale=1.0">
    <title>실행순서</title>

    <script>
    window.onload = function(){
        alert(2);
        var h1 = document.getElementById('h1');
        console.log('h1->', typeof(h1));
        h1.innerHTML = '변경2';
      };
    </script>

</head>

<body>

    <h1 id="h1">h1 태그가 생성 되었습니다.</h1>
    <script>
        alert(1);
        var h1 = document.getElementById('h1');
        console.log('h1!!!!!!->', typeof(h1));
        h1.innerHTML = '변경1';
    </script>

</body></html>


onload를 사용하지 않은 경우

1) [ 2 ] 창 뜨고

2) [ 1 ] 창 뜨고

3) 변경1

// 위에서부터 순서대로 실행된다 

<!DOCTYPE html>
<html lang="">
<head>
    <meta charset="utf-8">
    <meta name="viewport" content="width=device-width, initial-scale=1.0">
    <title>실행순서</title>

    <script>
//    window.onload = function(){
        alert(2);
        var h1 = document.getElementById('h1');
        console.log('h1->', typeof(h1));
        h1.innerHTML = '변경2';
//      };
    </script>

</head>

<body>

    <h1 id="h1">h1 태그가 생성 되었습니다.</h1>
    <script>
        alert(1);
        var h1 = document.getElementById('h1');
        console.log('h1!!!!!!->', typeof(h1));
        h1.innerHTML = '변경1';
    </script>

</body></html>

onload가 없어서 h1을 불러오지 못해서(?) 에러남!


1) 윈도우 객체확인


        var output = '';
        for (var key in window) {
            output += '[' + key + '] : ' + window[key] + '<br><br>';

        }

        window.onload = function() {
            document.body.innerHTML = output;
        };
        //console.log(window);


2) 네이버 창이 정해진 사이즈로 열리고, 글씨를 클릭하면 닫힌다.

open(URL, name, features, replace)


        window.onload = function() {
            //윈도우생성
            window.open();
            window.open('http://naver.com', 'newWin',
                'width=600, height=300', true);
            var child = window.open('', 'child', 'width=300, height=200');

            child.document.write('<h1 onclick="self.close();">From Parent window</h1>');
        };


3) 여러가지 객체 확인

        window.onload = function() {
            // 스크린객체
            // f12 누르고 보면 가로세로 길이 이런거나옴
            console.log(screen);
            // 로케이션 객체 확인
            console.log(location);           
            // 네비게이터 객체 확인
            console.log(navigator);
    
        };


• JSON 데이터는 이름과 값의 쌍으로 이루어집니다.
• JSON 데이터는 쉼표(,)로 나열됩니다.
• 객체(object)는 중괄호({})로 둘러쌓아 표현합니다.
• 배열(array)은 대괄호([])로 둘러쌓아 표현합니다.


<!DOCTYPE html>
<html lang="">
<head>
    <meta charset="utf-8">
    <meta name="viewport" content="width=device-width, initial-scale=1.0">
    <title>json</title>
    
    
    <script>
    
        var book = {
            name:'first java',
            price : 25000,
            publisher : 'FIRST'            
        };
        
        
        // 자바 스크립트의 오브젝트를 > String(JSON규격)
        // JSON.stringify(자바스크립트 오브젝트) : String으로 반환
        
        var jsonStr = JSON.stringify(book);
        
        window.onload = function(){
            document.getElementById('view').innerHTML=jsonStr;
            
            var str= '{"name":"first java","price":25000,"publisher":"FIRST"}';
            
            // json String > 자바 오브젝트
            var obj = JSON.parse(str);
            console.log(typeof(obj));
            console.log(obj);
            
        };
        
    
    </script>
</head>

<body>
    
    
    <h1 id="view"></h1>
    
</body>
</html>
       // 자바스크립트의 객체 생성
        // {}  : 중괄호를 이용해서 쉽게 객체 생성
        var obj = {}; // obj 이름의 객체를 생성
        //console.log('typeof(obj) =>',typeof(obj));

        // 객체의 속성 정의
        // 속성이름:속성값, 속성이름:속성값
        var member = {
            memberId: 'cool',
            memberName: '시원한',
            age: 15,
            chk: false,
            books: ['자바의정석', '퍼스트자바', '웹프로그래밍'],
            hello: function() {
                alert('안녕하세요');
            }
        };


        // 객체에 참조, 호출
        // 객체변수.속성이름
        // 객체변수.메소드이름()
        //console.log('회원의 아이디', member.memberId);
        //member.hello();

        //객체에 속성, 메소드 추가
        member.study = function() {
            alert(this.books[1] + '를 공부합니다.');
        };

        //member.study();

        member.nicName = 'COOL';

        // 속성의 삭제 : delete
        delete member.nicName;
       ///////////////////////////////////////

        // 학생들의 국어 영어 수학 점수를 관리하는 프로그램을 만들자.
        // 데이터는 학생 이름, 국어점수, 영어점수, 수학점수 -> 객체
        // 객체를 저장하는 배열

        // 학생 객체 구조
        var student = {
            name: 'KING',
            kor: 100,
            eng: 100,
            math: 100,
            sum: function() {
                return this.kor + this.eng + this.math;
            },
            avg: function() {
                return this.sum() / 3;
            }
        };

        // 학생들을 저장하는 배열을 생성
        var students = [];
        
        // 학생 데이터를 저장하는 Student 생성자 함수 정의        
        function Student(name, kor, eng, math) {
            this.name = name;
            this.kor = kor;
            this.eng = eng;
            this.math = math;
            };
            
            
        // 생성자 함수의 공통 속성은 prototype 속성으로 관리할수 있다.
        // 공통속성으로 정의하면 불필요한 메모리를 쓰지 않는다.
        // prototype 정의 : sum, avg, toString
        Student.prototype.sum = function() {
            return this.kor + this.eng + this.math;
        };
        
        Student.prototype.avg = function() {
            return this.sum() / 3;
        };
        
        Student.prototype.toString = function() {
            html = '   <tr>';
            html += '       <td>' + this.name + '</td>';
            html += '       <td>' + this.kor + '</td>';
            html += '       <td>' + this.eng + '</td>';
            html += '       <td>' + this.math + '</td>';
            html += '       <td>' + this.sum() + '</td>';
            html += '       <td>' + Math.floor(this.avg()) + '</td>';
            html += '   </tr>';

            return html;
        };             
        

        // 객체 생성
        var st1 = new Student('cool', 10, 20, 30);
        //console.log('typeof(st1)', typeof(st1));
        //console.log('st1', st1);
        
        // 배열에 요소 추가
        students.push(new Student('A01', 80, 80, 80));
        students.push(new Student('A02', 30, 100, 100));
        students.push(new Student('A03', 50, 80, 70));
        students.push(new Student('A04', 60, 60, 60));
        students.push(new Student('A05', 70, 50, 50));
        students.push(new Student('A06', 80, 80, 80));
        students.push(new Student('A07', 90, 90, 90));
        students.push(new Student('A08', 100, 100, 90));
        students.push(new Student('A09', 40, 80, 80));
        students.push(new Student('A10', 80, 80, 70));


        students.sort(function(left, right){
            return right.sum()-left.sum();
        });
        
        students = students.slice(0,3);
        
        var html = '<table border=1>';
        html += '   <tr>';
        html += '       <th>이름</th>';
        html += '       <th>국어</th>';
        html += '       <th>영어</th>';
        html += '       <th>수학</th>';
        html += '       <th>총점</th>';
        html += '       <th>평균</th>';
        html += '   </tr>';

        for (var i in students) {            
            html += students[i].toString();
        };

        html += '</table>';


        window.onload = function() {
            document.body.innerHTML = html;
        };


    </script>
</head>

<body>

</body></html>
        // 생성자 함수 
        function Rectangle(w,h){
            //this.width = w;
            //this.height = h;
            var width = w;
            var height = h;
            
            this.getWidth = function(){
                return width;
            }
            this.getHeight = function(){
                return height;
            }
            this.setWidth = function(w){
                width=w;
            }
            this.setHeight = function(h){
                height=h;
            }
        }
        
        var rec = new Rectangle(10,20);
        
        console.log('rec', rec.getWidth());
        console.log('rec', rec.getHeight());
        
        rec.setHeight(100);
        rec.setWidth(200);
        
        console.log('rec', rec.getWidth());
        console.log('rec', rec.getHeight());

        
        var arr = [11,78, 574, 1, 100];
        //arr.sort();
        
        /*arr.sort(function(left, right){
            return left-right;
        });*/
        
        arr.sort(function(left, right){
            return right-left;
        });
        
        
        console.log(arr);


- 익명함수 : function ( ) {} 형태는 함수이나 이름이 없음
- 선언적 함수 : 이름이 있는 함수
- 함수 호출 : 뒤에 괄호를 열고 닫음으로 코드를 실행

       // 함수 정의
        /*
            function 함수이름 (매개변수,...){
                // 데이터처리....
                return 데이터;
            }
        */
        
        function fn(){
            alert('이름을 명시적으로 정의한 함수');
        }
        
        // 변수에 함수를 정의하는 방식에서는 익명함수 형태로 정의
        var func = function(){
            alert('변수 func에 정의한 함수');
        }
        
        // 함수 호출
        fn();
        func();
        alert(typeof(fn)+', '+typeof(func));
        
        // 매개변수가 있는 함수        
        function add(num1, num2){
            var result = num1 + num2;
            return result;
        }
        
        alert(add(10,20));
        
        
        function sumAll(){            
            var result = 0;            
            for(var i=0; i< arguments.length; i++){
                result += arguments[i];
            }
            
            return result;
            
        }
        
        alert(sumAll(1,2,3,4,5,6,7,8,9,10));
        
        function callTenTimes(callback){
            for(var i=0; i<10; i++){
                callback();
            }
        }  
        
        function callTimes(callback, num){
            
            for(var i=0; i<num; i++){
                callback();
            }
            
        }
        
        var f1 = function(){
            console.log('callback function call!!');
        }
        
        function f2(){
            console.log('f2 call!!');
        }
        // setInterval() : 특정 간격마다 함수를 실행
        var intervalId = setInterval(function(){
            var html = '<h1>'+new Date()+'</h1>';
            document.body.innerHTML=html;
        }, 1000);
        
        var jsCode = 'var num3=10;';
        jsCode += 'alert(num3);';
        
        
        // setTimeout() : 특정 시간이 지나면 함수를 한번 실행
        setTimeout(function(){
            clearInterval(intervalId);
            alert(jsCode);
            eval(jsCode);
        },10*1000);


        alert(1);
        alert('"안녕하세요"')
        console.log('1+2=', 1+2);
        console.log(' "김" == "한" ==>', '김'=='한');
        console.log(' "김" > "한" ==>', '김'>'한')
        console.log(' "김" < "한" ==>', '김'<'한')
        
        console.log(' true > fasle ==> ', true>false);
        
        var num = 100;
        console.log('num =>', num);
        
        var number = 1000; // 숫자
        var str = 'String'; // 문자
        var bool = false; // 논리값
        var func = function(){}; // 함수
        var obj = {}; // 객체
        
        console.log('변수 타입 >' , typeof(number));
        console.log('변수 타입 >' , typeof(str));
        console.log('변수 타입 >' , typeof(obj));
        
       if(typeof(number)=='number'){
            alert('변수 number는 number타입입니다');
        }
       
        
        var food = '된찌';
        var food = '김찌';
        
        console.log(food);
        
        /* confirm : 사용자의 의사표현 묻는 함수 
        yes/no > true/false     */
        
       var check = confirm('삭제하시겠습니까?');
        console.log('check=',check);
        
        /*prompt : 사용자의 데이터 입력을 받는 함수*/
        var userData =prompt('숫자를 입력해주세요.', 100);
       
      var age = Number(userData);
        
        console.log('userDate >', userData+
                   ':'+ typeof(userData));
        console.log('age >', age + ':'+ typeof(age));
    
        if(age>19){
            alert('안녕하세요!')
        }else{
            alert('성인만 가능!');
        }*/
        
        
        var str = String(true);
        console.log('str의타입은 ',typeof(str));
        
        
       /* 논리값으로 변환하는 함수 : boolea*/
        console.log(Boolean(0));
        console.log(Boolean(NaN));
        console.log(Boolean(''));
        console.log(Boolean(null));
        console.log(Boolean(undefined));
        
        console.log(0==false); // true
        console.log(undefined==false); // NaN null un~은 false
        
        console.log(!0); //true
        console.log(!!0); //false
        
        console.log('123'== 123); // true
        console.log('123'=== 123); //자료형은 다르므로 false
        
        
        /* || 논리값이 false일때만 실행*/
        (1<0) || console.log('OK');
        (1>0) || console.log('KO') ; // 참이라 실행X


        /* && 논리값이 true일때만 실행*/
        (1<0) && console.log('OK'); // 거짓이라 실행X
        (1>0) && console.log('KO'); 
        
        /*
        자바스크립트의 배열
        대괄호( [ ] )로 생성 가능
        모든 타입이 들어갈 수 있다.*/
        
        var arr=[];
        var arr=[123,'hello',{}, function(){}, true ];
        
        console.log('arr>', typeof(arr));
        console.log('arr =>', arr);
        
        
        /*for 반복문을 이용해서 일괄 처리*/
           for(var i=0; i<arr.length; i++){
               console.log(String(i),arr[i]);
           }
        
        
        /* for in을 이용한 반복문 */
        for ( var i in arr){
            console.log(i, arr[i])
            
        }
        
    </script>
</head>

<body>
    
    <script>
        
        var name1='카카오';
        var name2='네이버';
        
        // alert(2);
        var htmlstr = '';
        htmlstr +='<ul class="no_style">\n';
        htmlstr +='     <li>'+name1+ '</li>\n';
        htmlstr +='     <li>'+name2+'</li>\n';
        htmlstr +='</ul>';
        
        console.log(htmlstr);
        
        /*document.body.innerHTML = '<h1>안녕</h1>';*/
        document.body.innerHTML = htmlstr;
    
    </script>
    
</body>
</html>

<script>
    // alert(3);
    
</script>

static (기본값) :위치를 지정하지 않을 때 사용한다.

relative : 위치를 계산할때 static의 원래 위치부터 계산한다.

absolute : 원래 위치와 상관없이 위치를 지정할 수 있다. 단, 가장 가까운 상위 요소를 기준으로 위치가 결정 된다.

fixed : 원래 위치와 상관없이 위치를 지정할 수 있다. 하지만 상위 요소에 영향을 받지 않기 때문에 화면이 바뀌더라도 고정된 위치를 설정 할 수 있다. 브라우저 화면의 상대 위치를 기준으로 위치가 결정된다.


참고링크 : 


[css] position (static, relative, absolute, fixed) 의 속성

[css] position (static, relative, absolute, fixed) 의 속성 position 은 레이아웃을 배치하거나, 객체를 위치시킬때 사용하는 css 속성이다. position 속성은 상속되지 않으며, 위(top), 아래(bottom), 왼쪽(..

electronic-moongchi.tistory.com


1) z-position / 숫자가 클수록 앞에 위치한다.


<!DOCTYPE html>
<html lang="">
<head>
    <meta charset="utf-8">
    <meta name="viewport" content="width=device-width, initial-scale=1.0">
    <title>POSITION 속성 </title>
</head>
    
    <style>
        div.box{
            width : 100px;
            height: 100px;
            border : 10px solid black;
            text-align: center;
            line-height: 100px;
            font-size : 30px;
            color : wheat;
            /*포지션 앱솔루트*/
            position: absolute;
            margin : 0;
        }
        
        #box1{
            background-image: url(image/tae1.jpg);
            background-size : 100%;
            /*위치설정*/
            left : 50px;
            top : 50px;
            /*숫자가 클수록 앞에온다*/
            z-index: 2; 
        }
          
        #box2{
            background-image: url(image/tae1.jpg);
            background-size : 100%;
            left : 100px;
            top: 100px;
            z-index: 3;
        }
          
        #box3{
            background-image: url(image/tae1.jpg);
            background-size : 100%;
            left : 150px;
            top : 150px;
            z-index: 1;
        }
        
        #box4{
            background-image : url(image/tae1.jpg);
            background-size : 100%;
            right : 50px;
            bottom : 50px;
        }
        
        
    </style>

<body>
    
    <div id="box1" class="box">1</div>
    <div id="box2" class="box">2</div>
    <div id="box3" class="box">3</div>
    <div id="box4" class="box">4</div>
    
</body>
</html>


2) 


<!DOCTYPE html>
<html lang="">
<head>
    <meta charset="utf-8">
    <meta name="viewport" content="width=device-width, initial-scale=1.0">
    <title>POSITION 속성 </title>
</head>
    
    <style>
        div.box{
            width : 100px;
            height: 100px;
            border : 5px solid black;
            text-align: center;
            line-height: 100px;
            font-size : 30px;
            color : wheat;
            position: absolute;
            margin : 0;
        }
        
        #box1{
            background-image: url(image/tae3.jpg);
            background-size : 100%;
            /*위치설정*/
            left : 10px;
            top : 10px;
        }
          
        #box2{
            background-image: url(image/tae2.jpg);
            background-size : 100%;
            left : 20px;
            top: 20px;          
        }
          
        #box3{
            background-image: url(image/tae4.jpg);
            background-size : 100%;
            left : 30px;
            top : 30px;    
        }
        
        #wrap{
            position:relative;
            height: 50px;
            width : 300px;
            border: 1px solid black;
            overflow: auto;
        }
        
        
    </style>

<body>
    
    <h1> H E A D E R</h1>
    
    <div id="wrap">
    <div id="box1" class="box">1</div>
    <div id="box2" class="box">2</div>
    <div id="box3" class="box">3</div>
    </div>
    
    <h1>F O O T E R</h1>
    
</body>
</html>


3)


<!DOCTYPE html>
<html lang="">
<head>
    <meta charset="utf-8">
    <meta name="viewport" content="width=device-width, initial-scale=1.0">
    <title>문제풀기</title>
    
    <style>
        div.sq{
            width: 100px;
            height: 100px;
            border : 1px solid grey;
            position: absolute;
            margin : 0;
            border-radius: 100px;
        }
        
        #sq1 {
            background-color : pink;
            background-image : url(image/tae8.gif);
            background-size : 130%;
            left : 10px;
            top : 10px;
        }
        #sq2 {
            background-image : url(image/tae9.gif);
            background-size : 130%;
            right : 10px;
            top : 10px;
        }
        #sq3 {
            background-image : url(image/tae10.gif);
            background-size : 130%;
            right:10px;
            bottom:10px;
        }
        #sq4 {
            background-image : url(image/tae11.gif);
            background-size : 100%;
            left:10px;
            bottom:10px;
        }
    </style>
    
</head>

<body>
    
    
    <div id="sq1" class=sq></div>
    <div id="sq2" class=sq></div>
    <div id="sq3" class=sq></div>
    <div id="sq4" class=sq></div>
    
</body>
</html>

'front-end > HTML & CSS' 카테고리의 다른 글

[css] button / 버튼만들기  (0) 2020.11.24
[css] background  (0) 2020.11.24
[css] attribute / 속성  (0) 2020.11.24
[css] 선택자  (0) 2020.11.23
[html5] table  (0) 2020.11.23
[html5] select  (0) 2020.11.23
[html5] form tag / input type  (0) 2020.11.23

<!DOCTYPE html>
<html lang="">
<head>
    <meta charset="utf-8">
    <meta name="viewport" content="width=device-width, initial-scale=1.0">
    <title>css를 이용한 버튼</title>
        <link rel="preconnect" href="https://fonts.gstatic.com">
    <link href="https://fonts.googleapis.com/css2?family=Nerko+One&display=swap" rel="stylesheet">
</head>
    <style>
    
        &{
            margin:0;
            padding:0;
        }
        
        
        #btn{
            background-color: orange;
            width: 300px;
            height: 200px;            
            margin: 100px;
            border : 20px solid #EEEEEE;
            border-radius: 30px;
            text-align: center;
            line-height: 200px;
        }
        
        #btn>a{
            /*block으로바뀌어서 hover*/
            display: block;
            border-radius: 10px;
            font-family: 'Nerko One', cursive;
            font-size : 6em;
            font-weight: 500;
            text-decoration: none;
            color : #FFFFFF;
            /*font-style: italic*/
        }
        
        #btn>a:hover{
            background-color: darkgreen;
            color : green;
            background-image: url(image/tae8.gif);  
            background-size : 100%;
    </style>

<body>
    
    <div id="btn">
        <a>TAE</a>
    </div>
    
</body>
</html>


'front-end > HTML & CSS' 카테고리의 다른 글

[css] position  (0) 2020.11.24
[css] background  (0) 2020.11.24
[css] attribute / 속성  (0) 2020.11.24
[css] 선택자  (0) 2020.11.23
[html5] table  (0) 2020.11.23
[html5] select  (0) 2020.11.23
[html5] form tag / input type  (0) 2020.11.23
tag 비고
bg-imag : url(); 배경에 배경사진 넣기
bg-repeat 배경화면 사진 반복 여부 / no-repeat
position 포지션 / 위치 정해주기
attachment 배경화면 고정하기
size 사이즈 조절하기 contain(안으로)
color 색깔
    SIZE : 
  • auto : 이미지 크기를 유지합니다.
  • length : 값을 두 개 넣으면 첫번째 값이 가로 크기, 두번째 값이 세로 크기입니다. 값을 한 개 넣으면 가로 크기이며, 세로 크기는 원본 이미지의 가로 세로 비율에 맞게 자동으로 정해집니다. 백분율을 사용할 수도 있습니다.
  • cover : 배경을 사용하는 요소를 다 채울 수 있게 이미지를 확대 또는 축소합니다. 가로 세로 비율을 유지합니다.
  • contain : 배경을 사용하는 요소를 벗어나지 않는 최대 크기로 이미지를 확대 또는 축소합니다. 가로 세로 비율을 유지합니다.
  • initial : 기본값으로 설정합니다.
  • inherit : 부모 요소의 속성값을 상속받습니다.
<!DOCTYPE html>
<html lang="">
<head>
    <meta charset="utf-8">
    <meta name="viewport" content="width=device-width, initial-scale=1.0">
    <title>background image</title>
</head>

    <style>
    
        body{
            background-image: url(image/tae1.jpg);
            background-size : 200px;
            background-repeat: no-repeat;
            background-position: bottom right;
            background-attachment: fixed
            /*background-repeat: repeat-y;*/
        }
    
        div{
            height : 300px;
            /*background-color: rebeccapurple;*/
            /*background-image : url(image/tae1.jpg);*/
            /*background-size : 50% 50%;*/
            background-size : contain;
        }
    </style>
    
<body>
    
    <div>
    
    </div>
    
</body>
</html>

'front-end > HTML & CSS' 카테고리의 다른 글

[css] position  (0) 2020.11.24
[css] button / 버튼만들기  (0) 2020.11.24
[css] attribute / 속성  (0) 2020.11.24
[css] 선택자  (0) 2020.11.23
[html5] table  (0) 2020.11.23
[html5] select  (0) 2020.11.23
[html5] form tag / input type  (0) 2020.11.23

<!DOCTYPE html>
<html lang="ko">
<head>
    <meta charset="utf-8">
    <meta name="viewport" content="width=device-width, initial-scale=1.0">
    <title>CSS 속성</title>
    <link rel="preconnect" href="https://fonts.gstatic.com">
    <link href="https://fonts.googleapis.com/css2?family=Nerko+One&display=swap" rel="stylesheet">

    <style>
        h1.title {
            background-color: black;
            color: pink;
            font-size: 30 px
        }

        body {
            /*url은 경로를 표현한다*/
            background-image: url(image/tae4.jpg);
        }
    </style>

    <style>
        #size1>div:nth-child(1) {
            font-size: 100%;
        }

        #size1>div:nth-child(2) {
            font-size: 150%;
        }

        #size1>div:nth-child(3) {
            font-size: 200%;
        }
    </style>

    <style>
        #size2>div:nth-child(1) {
            font-size: 1.0em;
        }

        #size2>div:nth-child(2) {
            font-size: 1.5em;
        }

        #size2>div:nth-child(3) {
            font-size: 2.0em;
        }
    </style>

    <style>
        #size3>div:nth-child(1) {
            font-size: 16px;
        }

        #size3>div:nth-child(2) {
            font-size: 24px;
        }

        #size3>div:nth-child(3) {
            font-size: 32px;
        }
    </style>

    <style>
        #color>h4:nth-child(1) {
            /*키워드를 이용한 색상 표현*/
            background-color: aquamarine;
            color: blue;
        }

        #color>h4:nth-child(2) {
            /*rgb를 이용한 색상 표현*/
            background-color: rgb(255, 225, 255);
            color: rgb(0, 150, 150);
        }

        #color>h4:nth-child(3) {
            /*#rgba를 이용한 색상표현 : 투명도 표현*/
            background-color: rgba(100, 200, 240, 0.7);
            color: rgb(0, 0, 150);
        }

        #color>h4:nth-child(4) {
            /*#000000을 이용한 색상표현*/
            background-color: #1F158A;
            color: #FF889A;

        }
    </style>
    
    <style>
        /*박스속성 : width, height, border, padding, margin*/

        #box1 {
            background-color: black;
            color: wheat;

            /*표현영역*/
            width: 100px;
            height: 100px;

            /*테두리*/
            border: 10px solid pink;

            /*테두리와 텍스트 사이의 간격*/
            padding: 15px; /*padding-top: 50px;*/
            
            /*요소 태그들과의 간격*/
            margin : 20px;
            margin-left : 300px;
        
        }
    </style>
    
    <style>
    
        #box2 {
            background-color: pink;
            width : 100px; height: 100px;
            padding:10px; margin:10px;
            border : 10px solid grey;
            /*raidus 순서 : 11시 방향부터 시계방향*/
            /*border-radius: 10px 30px 10px 30px*/
            border-radius: 100px;
            background-image : url(image/tae1.jpg);
            background-size : contain;
            
        }
    </style>

    <style>
        
        #display span{
            background-color : #FFFFF0;
            width:100px;
            height: 100px;
        }
    
        #display>span:nth-child(1){
            /*화면에서 요소 태그를 표현하지 않는다*/
            /*display: none;*/
            
        }
        #display>span:nth-child(2){
            /*블럭속성*/
            display :inline-block;
            
        }
        #display>span:nth-child(3){
            
        }


    </style>
    
    <style>
    
        #font{
            font-family: 'Nerko One', cursive;
            font-size : 4em;
            font-weight: bold;
            font-style : italic;
            color : darkorchid;
            text-align: center
        }
    </style>
    
    <style>
        h3{
            text-align: center;            
        }
        h3+h4{
            text-align: right;
            margin-right: 50px;
        }
        h3+h4+p{
            line-height: 180%;
        }
    </style>
</head>

<body>
    
    
    <h1 class="title">텍스트의 중앙 정렬</h1>
    <h3>텍스트 수평 방향의 정렬</h3>
    <h4>2020.11.24</h4>
    <p>에스콰이어는 방탄소년단에 대해 “멤버들은 팝의 정상에 올랐고, ‘인기’를 새롭게 정의했으며, 전통적인 ‘남성성’에 정면 도전했다”라고 소개했다. 이어 “멤버 간 서로에 대한 애정, 자신의 인생이나 가사를 통해 본인의 약점과 감정을 드러내는 (방탄소년단의) 방식이, 스스로에게는 물론이고 서로에게 정형화한 틀을 끊임 없이 강요하는 전통적인 남성들의 방식보다 더 어른스럽고 남성적으로 보인다”라고 평가했다.</p>


   <h1 class="title">폰트 속성 : font-family, -size, -style -weight</h1>
    <div id="font">
        Hello! we are BTS!
    </div>
    <h1 class="title">Display 속성 : none, block, inline, inline-block</h1>
    <div id="display">
        <span>span1</span>
        <span>span2</span>
        <span>span3</span>
        
    </div>
    

    <h1 class="title"> 박스 속성 : width, height, border, padding, margin</h1>

    <div>
        <div id="box2">BOX2</div>
        <div id="box1">BOX BOX BOX BOX BOX BOX BOX BOX BOX BOX </div>
    </div>

    <h1 class="title">color를 표현하는 단위</h1>
    <div id="color">

        <h4> 키워드를 이용한 색상 표현</h4>
        <h4> rag (R,G,B) 이용 색상 표현</h4>
        <h4> rgba(R,G,B,A) 이용 색상표현</h4>
        <h4> #000000</h4>
    </div>

    <h1 class="title">Font-size : 단위를 확인</h1>

    <div id="size1">
        <div>font-size : 100 %</div>
        <div>font-size : 150 %</div>
        <div>font-size : 200 %</div>

    </div>

    <div id="size2">
        <div>font-size : 1.0em</div>
        <div>font-size : 1.5em</div>
        <div>font-size : 2.0em</div>

    </div>

    <div id="size3">
        <div>font-size : 16px</div>
        <div>font-size : 24px</div>
        <div>font-size : 32px</div>

    </div>


</body></html>


'front-end > HTML & CSS' 카테고리의 다른 글

[css] position  (0) 2020.11.24
[css] button / 버튼만들기  (0) 2020.11.24
[css] background  (0) 2020.11.24
[css] 선택자  (0) 2020.11.23
[html5] table  (0) 2020.11.23
[html5] select  (0) 2020.11.23
[html5] form tag / input type  (0) 2020.11.23
<!DOCTYPE html>
<html lang="ko">
<head>
    <meta charset="utf-8">
    <meta name="viewport" content="width=device-width, initial-scale=1.0">
    <title>CSS 선택자</title>

    <style>
        /* 선택자{
            속성이름 : 속성값;
            }  */

        /* 전체선택자 : 전체 폰트 컬러 값 등을 지정 
        *{
            color : purple;
        }*/


        /* 태그선택자 */
        /*
        h1, p, body {margin: 0; padding: 0;}
*/

        h1 {
            background-color: #E2A9F3;
            color: white;
        }

        p {
            color: purple;
        }


        div {
            text-align: center
        }

        form {
            border: 1px solid grey;
        }

        ul {
            border: 1px solid blue;
        }

        li {
            border: 1px solid red;
            color: green;
        }

        /* 아이디 선택자 : #id */

        #header {
            background-color: #A9E2F3;
        }

        #aside {
            background-color: #F6CECE;
        }

        #content {
            background-color: #E0F8EC;
        }

        /* 클래스 선택자 : 요소의 class 속성이 있는 것을 지정하는 선택자 */

        /* div를 붙이면 div이고 클래스가 color_white인 요소 */

        div.color_black {
            color: black;
        }

        .color_red {
            color: red;
        }

        .font_size_32 {
            font-size: 32px;
        }

        .font_weight_bold {
            font-weight: 1000;
        }

        .font_italic {
            font-style: italic;
        }

        /* 속성 선택자 : 선택자[속성이름]*/
        input[type] {
            background-color: darkkhaki;
            color: white;
        }

        /* 속성 선택자 : 선택자[속성이름=값] */
        input[type=button] {
            background-color: aqua;
            padding: 8px;
            margin: 10px;
            font-size: 20px;
            font-weight: bold;
        }

        /*  선택자[속성이름=값 */
        img[src$=png] {
            border: 3px solid red;
        }

        img[src$=gif] {
            border: 3px solid blue;
        }

        img[src$=jpg] {
            border: 3px solid black;
        }

        /* 후손 선택자 : 선택자A 선택자B
        A 태그 하위에 존재하는 태그를 기준으로 B선택자로 선택 */

        #header1 h1 {
            background-color: black;
            color: aliceblue;
            font-size: 16px;
        }

        /* 자손 선택자 : 선택자A(부모) > 선택자B(자손)
        선택자 A로 선택된 태그 바로 아래의 태그들 중 선택자B로 선택 */
        #header1>h1 {
            border: 5px solid pink;
            font-style: italic;
        }

        #nav h1 {
            border: 5px solid aqua;
        }

        /*동위 선택자 : 범위를 한정해서 선택
        선택자A+선택자B > A선택자 태그 바로 뒤에 있는 선택자B
        선택자A~선택자B > A선택자 바로뒤에있는 선택자B 전부. */
        
        #div1>h1+h2{
            background-color : red;
            color : yellow;
        }
        
        /*h1~h2로 하면 h2 다바뀜*/
        #div1>h1+h2~h2 { 
            background-color :black;
            color: aqua;
        }
        
        /* 반응 선택자
        :hover  > 마우스 커서가 특정 태그 위로 올라갈 때
        :active > 마우스 버튼 누르고 있는 상태 */
        
        h1:hover {
            background-color: green;
            cursor: pointer;
        }
        
        h2:active {
            background-color : blue;
            color : white;
        }
        
        /* 상태선택자 
        :check > 체크 상태의 input 태그 선택 > checkox, radio
        :focus > 초점이 맞추어진 input 태그 선택 > 모든 input
        :enabled > 사용 가능한 input 태그 선택
        :disabled >사용 불가능한 input 태그 선택 */
        
        input:enabled{
            border : 1px solid blue;
            background-color: aqua;
        }
        
        input:disabled{
            border : 1px solid red;
            background-color: grey;
        }
        
        input:focus{
            background-color: yellow;
        }
        
        #msg {
            padding:20px;
            background-color : bisque;
            display : none;
        }
        
        input[type=checkbox]:checked+#msg{
            display: block
        }
        
        /*구조선택자*/
        /*잘보기위해 테두리와 ㅇ 없앰*/
        #nav, #nav>li {
            border : 0;
            list-style: none; 
            margin:0;
            padding:0;
        }
        
        #nav{
            margin : 20px 0;
            overflow : hidden;
            /*float : left 속성을 #nav안으로 한정한다*/
        }
        
        #nav>li{
            /* >>> 쪽으로 바뀜 */
            float : left;
            /* 상하 좌우 픽셀*/
            padding : 0 20px;            
            border : 1px solid gray;
        }
        
        #nav>li:first-child{
            border-radius: 10px 0 0 10px;
        }
        
        #nav>li:last-child{
            border-radius: 0 10px 10px 0;
        }
        
        #nav>li:nth-child(2n){
            background-color: mediumaquamarine;
        }
        
        #nav>li:nth-child(2n+1){
            background-color: bisque
        }
        
        /*문자선택자
        ::first-letter
        ::frist-line*/
        
        p::first-letter{
            font-size:300%;
        }
        p::first-line{
            color : darkgreen;
        }
        p::selection{
            background-color: crimson;
            color : bisque;
        }
        
        /* 링크 선택자
        :link
        :visited */
        
        a:link{
            color : black;
            text-decoration-line: none;
        }
        a:visited{
            color : red;
            text-decoration-line: none;
        }
        a:hover{
            color : blue;
        }
        
        a:link:after{
            /*가상태그*/
            content : ' - ' attr(href);    
        }
        
        a:link:before{
            content : attr(href) ' - ' ;    
        }
        
    </style>
</head>

<body>
    
    <!--링크선택자-->
    <h3> 
    <a href="http://naver.com">네이버</a>
    </h3>
    
    
    <!--구조선택자-->
    <ul id="nav">
        <li>1</li>
        <li>2</li>
        <li>3</li>
        <li>4</li>
        <li>5</li>
        <li>6</li>
        <li>7</li>
        <li>8</li>        
    </ul>
    
    <!--상태선택자-->
    숨기기 <input type="checkbox">
    <div id="msg" style="text-align: left">
        체크박스를 체크하면 보입니다~
    </div>
    <br>
    <input value="입력가능"> <br>
    <input disabled value="입력불가능">
    
    
    <!--반응선택자-->
    <div id="div2">
        <h1>hover - 1</h1>
        <h2>hover - 2</h2>
    </div>
    <!--동위선택자예제-->
    <div id="div1">
        <h1>Header - 1</h1>
        <h2>Header - 2</h2>
        <h2>Header - 2</h2>
        <h2>Header - 2</h2>
        <h2>Header - 2</h2>
    </div>


    <!--후손/자손선택자예제-->
    <div id="header1">
        <h1 class="title">Lorem ipsum</h1>
        <div id="nav">
            <h1>Navigation</h1>
        </div><br>
    </div><br><br><br>


    <div id="section">
        <h1 class="title">Lorem ipsum</h1>
        <p>Lorem ipsum dolor sit amet, consectetur adipiscing elit.</p>
    </div>


    <!--선택자[속성이름=값] 특정예제-->
    <img src="image/tae1.jpg" width="100">
    <img src="tae6.jpg" width="100">
    <img src="image/tae3.png" width="100">

    <!--속성선택자-->
    <h1>form tag -> input</h1>
    <br>
    <form>
        <ul>
            <li>
                <input type="text">
            </li>
            <li>
                <input type="button" value="Button">
            </li>
            <li>
                <input type="password" value="Button">
            </li>
            <li>
                <input type="button" value="new Button">
            </li>
        </ul>

    </form>

    <br>
    <!--아이디선택자 / 클래스 선택자 예제-->
    <div id="header" class="color_black font_size_32 font_italic">header</div>
    <div id="aside" class="color_red font_weight_bold">aside</div>
    <div id="content" class="color_black">content</div>

    <br>
    <!--태그선택자 / 문자선택자 예제-->
    <h1 class="color_black">방탄소년단, 'Life Goes On' 1억뷰 기록 ”韓가수 최다”</h1>

    <p>
        그룹 방탄소년단이 1억뷰 뮤직비디오를 추가하고 한국 가수 최다 억대 뮤직비디오를
        보유하게 됐다. 방탄소년단이 지난 20일 발표한 새 앨범 ‘BE (Deluxe Edition)’의 
        타이틀곡 ‘Life Goes On’ 뮤직비디오 유튜브 조회수가 11월 22일 오후 5시 48분경 조회수
        1억 건을 넘었다. 이로써 방탄소년단은 통산 27번째 억뷰 뮤직비디오를 보유하게 됨과 
        동시에 한국 가수 최다 기록을 자체 경신했다. 방탄소년단의 ‘BE (Deluxe Edition)’는 
        지금까지 이들이 선보인 정규 시리즈 앨범과는 다른 형태의 앨범으로, 
        지금 이 순간에 느끼는 솔직한 감정, 나아가 앞으로 계속 살아가야 하는 ‘우리’라는 
        존재에 관한 이야기를 담고 있다. 방탄소년단은 ‘Life Goes On’을 통해 열심히 달리다 
        멈춰 설 수밖에 없는, 원치 않는 상황과 마주했지만 “그럼에도 삶은 계속된다”라는 위로의 
        메시지를 전한다.
    </p>
</body></html>


'front-end > HTML & CSS' 카테고리의 다른 글

[css] position  (0) 2020.11.24
[css] button / 버튼만들기  (0) 2020.11.24
[css] background  (0) 2020.11.24
[css] attribute / 속성  (0) 2020.11.24
[html5] table  (0) 2020.11.23
[html5] select  (0) 2020.11.23
[html5] form tag / input type  (0) 2020.11.23

1) 테이블 만들기


주제 태그 비고
테이블의 구성요소 <table> 테이블을 만드는 태그
<th> 테이블의 헤더 부분 
<tr> 테이블의 행
<td> 테이블의 열
    <table border="1">
	<th>테이블</th>
	<th>만들기</th>
	<tr><!-- 첫번째 줄 시작 -->
	    <td>첫번째 칸</td>
	    <td>두번째 칸</td>
	</tr><!-- 첫번째 줄 끝 -->
	<tr><!-- 두번째 줄 시작 -->
	    <td>첫번째 칸</td>
	    <td>두번째 칸</td>
	</tr><!-- 두번째 줄 끝 -->
    </table>
테이블 만들기
첫번째 칸 두번째 칸
첫번째 칸 두번째 칸


2) 테이블 디자인


주제 속성 비고
테이블의 디자인 변경 border 테두리 / 두께
bordercolor 테두리 / 색상
width 테이블 가로 크기
height 테이블 세로 크기
align 정렬
bgcolor 배경색
colspan 가로합병 (열)
rowspan 세로합병 (행)
<table border="1" bordercolor="#088A29" width ="500" height="300" align = "center" >
<!--티스토리에서는 가로길이 설정이 구려서 일단냅둠-->
    <tr align = "center" bgcolor="#BEF781">
	<td>내용</td>
	<td>수입</td>
	<td>지출</td>
    </tr>
    <tr>
	<td>월급!</td>
	<td>1,000,000</td>
	<td></td>
    </tr>
    <tr>
	<td>점심값</td>
	<td></td>
	<td>5,000</td>
    </tr>
    <tr>
	<td>부모님선물</td>
	<td></td>
	<td>30,000</td>
    </tr>
    <tr>
	<td rowspan="3" align = "center" bgcolor="#BEF781">총계</td>
	<td>수입</td>
	<td>지출</td>
    </tr>
    <tr>
	<td>1,000,000</td>
	<td>35,000</td>	
    </tr>
    <tr>
	<td>남은돈</td>
	<td>965,000</td>	
    </tr>
</table>


내용 수입 지출
월급! 1,000,000  
점심값   5,000
부모님선물   30,000
총계 수입 지출
1,000,000 35,000
남은돈 965,000

'front-end > HTML & CSS' 카테고리의 다른 글

[css] position  (0) 2020.11.24
[css] button / 버튼만들기  (0) 2020.11.24
[css] background  (0) 2020.11.24
[css] attribute / 속성  (0) 2020.11.24
[css] 선택자  (0) 2020.11.23
[html5] select  (0) 2020.11.23
[html5] form tag / input type  (0) 2020.11.23
        생일1 <select name="birthyear">
            <option>2020</option>
            <option>1950</option>
        </select>년
        <select name="bmonth">
            <!--value값을 명시해주면 숫자만 받을 수 있다-->
            <option value="1">1월</option>
            <option value="12">12월</option>
        </select>월
        <select name="bday">
            <option>1</option>
            <option>31</option>
        </select>일
        <br>

        생일2
        <input type="date" name="birthday"><br>
생일1
생일2

'front-end > HTML & CSS' 카테고리의 다른 글

[css] position  (0) 2020.11.24
[css] button / 버튼만들기  (0) 2020.11.24
[css] background  (0) 2020.11.24
[css] attribute / 속성  (0) 2020.11.24
[css] 선택자  (0) 2020.11.23
[html5] table  (0) 2020.11.23
[html5] form tag / input type  (0) 2020.11.23

Form tag


type = text :
type = password :
type = checkbox :
type = radio : A B C
type = color :
type = date :
type = datetime-local :
type = month :
type = week :
type = time :
type = email :
type = file :
type = hidden : 화면에는 표현되지 않는다.
type = image :
type = number :
type = range :
type = tel :
type = url :

type = sumbmit :
type = reset :


<!DOCTYPE html>
<!-- HTML5 문서임을 정의 -->
<html lang = "ko">
    <head>
        <title>form tag 연습</title>
        <meta charset="utf-8">
        <style></style>
        <script></script>
    </head>
    <body>
    
        <h1>Form tag</h1>
        <hr> <!--선-->
        
        <!--
        서버로 전송하고자 하는 폼 데이터를 묶는다.
        action : 데이터를 전송할 경로 - 위치
        method : 전송하는 방식 - get / post 방식
        -->
        <form action="#" method="get">
        
            type = text : <input type="text" name="username"><br>
            type = password : <input type="password" name="password"><br>
            type = checkbox : <input type="checkbox" name="chk" value="ok"><br>
            type = radio : 
            A <input type="radio" name="choice" value="A">
            B <input type="radio" name="choice" value="B">
            C <input type="radio" name="choice" value="C"><br>
            type = color : <input type="color" name="color"><br>
            type = date : <input type="date" name="date"><br>
            type = datetime-local : <input type="datetime-local" name="localdatetime"><br>
            type = month : <input type="month"><br>
            type = week : <input type="week"><br>
            type = time : <input type="time" name="time"><br>
            type = email : <input type="email" name="email"><br>
            type = file : <input type="file" name="userphoto"><br>
            type = hidden : 화면에는 표현되지 않는다. <input type="hidden" name="idx" value="1"><br>
            type = image : <input type="image" src="dispatch.png" height="50"><br>
            type = number : <input type="number" name="num"><br>
            type = range : <input type="range" name="age" min="0" max="150"><br>
            type = tel : <input type="tel"><br>
            type = url : <input type="url" name="url"><br>


            <br>
            type = sumbmit : <input type="submit"><br>
            type = reset : <input type="reset">
   
        
        </form>
    </body>
</html>

'front-end > HTML & CSS' 카테고리의 다른 글

[css] position  (0) 2020.11.24
[css] button / 버튼만들기  (0) 2020.11.24
[css] background  (0) 2020.11.24
[css] attribute / 속성  (0) 2020.11.24
[css] 선택자  (0) 2020.11.23
[html5] table  (0) 2020.11.23
[html5] select  (0) 2020.11.23

+ Recent posts